How to generate keys for Mutual TLS Authentication 🔑

At RAZRLAB, we always keep security at the upmost importance and a simple way to ensure that your IoT devices and your server are securely communicating is to leverage the concept of Mutual TLS Authentication.
What is Mutual Authentication?
Mutual TLS authentication is a process that ensures that traffic between entities is secure and trusted in both directions between a client and a server. It essentially takes place through a TSL handshake.
This takes place with a root certificate authority (CA) which essentially allows only requests from the devices with a corresponding client certificate issued for it. When a client request reaches the server, the server responds with a request for the client to present its certificate. If the client fails to present the request is not allowed to process, but if it does have a certificate a key exchange takes place for verification.
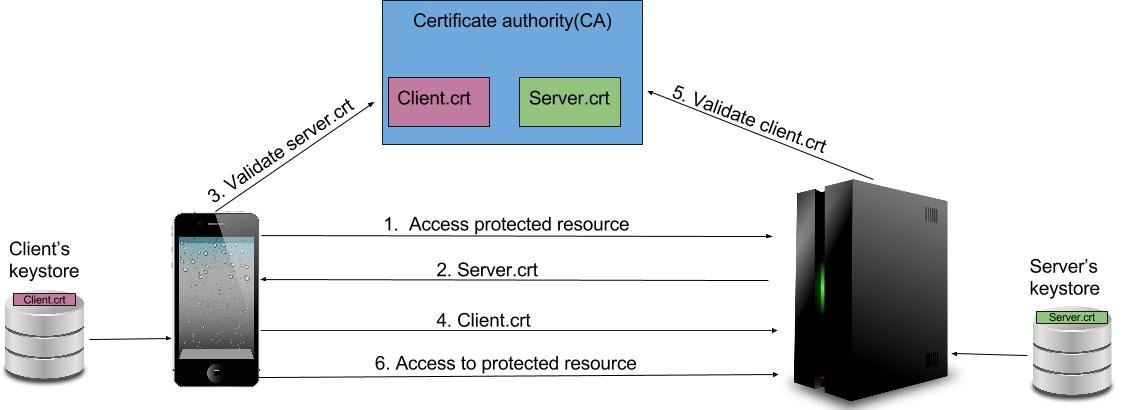
Mainly two things happen in this process:
- The client will validate that the server is trusted to serve up content for the given configured DNS name
- The server will also validate the client is known by the CA and will authenticate it.
The process will ensure that both parties (client and server) are verified by each other and therefore, mutual authentication takes place and both parties end up trusting each other.
Uff.... now that we have taken the theory out of the way, let's see how we can quickly setup a Mutual TLS Authenticated client and server setup.
How to setup Mutual TLS Authentication
Pre-requisites
We are going to use openssl to generate certificates, hence, we will need a computer to have the package available.
Check if you have openssl on your system by using the following command on your terminal:
openssl version -a
If you don't have openssl use the following links to it up on your system:
- To install on Linux (Ubuntu) click here
- To install on Windows click here
- To install/update on Mac using Homebrew click here
Generate a Certificate Authority (CA)
Run the following command to generate keys for certificate authority (CA)
openssl req -new -x509 -days 9999 -keyout ca-key.pem -out ca-crt.pem
You'll need to fill in the following prompts:
- You'll be asked to insert CA password. Input a preferred password that you'll remember.
- You'll be prompted to specify a CA Common Name. Insert that you prefer like
root.localhostorca.localhost.
The CA Common Name must be different for both server and client.
Generate a Server Certificate
First we start with generating key for the server
openssl genrsa -out server-key.pem 4096
Now, generate a Server Certificate Signing Request
openssl req -new -key server-key.pem -out server-csr.pem
You'll need to fill the in the following prompts:
- You'll be prompted to specify a CA Common Name. Insert that you prefer like
localhostorserver.localhost. - Optionally insert a challenge password
The client will need to verify the Common Name, so make sure you have a valid DNS name for this.
Now sign the certificate using the Certificate Authority
openssl x509 -req -days 9999 -in server-csr.pem -CA ca-crt.pem -CAkey ca-key.pem -CAcreateserial -out server-crt.pem
You'll be prompted to insert the password for the Certificate Authority (CA).
Seems like you have successfully generate your Server Certificate, you can verify the certificate using the following command:
openssl verify -CAfile ca-crt.pem server-crt.pem
Generate a Client Certificate
Once again, we start with generating key for the Client
openssl genrsa -out client1-key.pem 4096
Now, generate a Client Certificate Signing Request
openssl req -new -key client1-key.pem -out client1-csr.pem
You'll need to fill the in the following prompts:
- You'll be prompted to specify a CA Common Name. Insert that you prefer like
client.localhost. The server should not verify this, since it should not do a reverse DNS lookup. - Optionally insert a challenge password
Now sign the certificate using the Certificate Authority
openssl x509 -req -days 9999 -in client1-csr.pem -CA ca-crt.pem -CAkey ca-key.pem -CAcreateserial -out client1-crt.pem
You'll be prompted to insert the password for the Certificate Authority (CA).
Now, that you have successfully generated your Client Certificate, you can verify the certificate using the following command:
openssl verify -CAfile ca-crt.pem client1-crt.pem
Now, you can use the keys to perform Mutually Authenticated communication between your client and the server.
I have also setup an example repository using Node.js-based clients and server leveraging Mutual TLS Authentication to send messages. Click here to view the repository.
Happy Grizzly Coding 🐻

Related Posts

How to create an SSH tarpit
A quick an easy way get back at those obnoxious hacker that target to gain SSH access to your Linux server. This article will show you how to trap the hackers in a SSH tarpit.

Easy PGP Encryption using Node.js
An easy setup guide on how to begin using PGP Encryption on Node.js

What's New in Node.js 24 (And How to Upgrade Your Codebase Smoothly)
Node.js 24 is here with game-changing features like V8 13.6, Float16Array, explicit resource management, WebAssembly Memory64, and npm 11. Learn what's new and how to upgrade smoothly.